
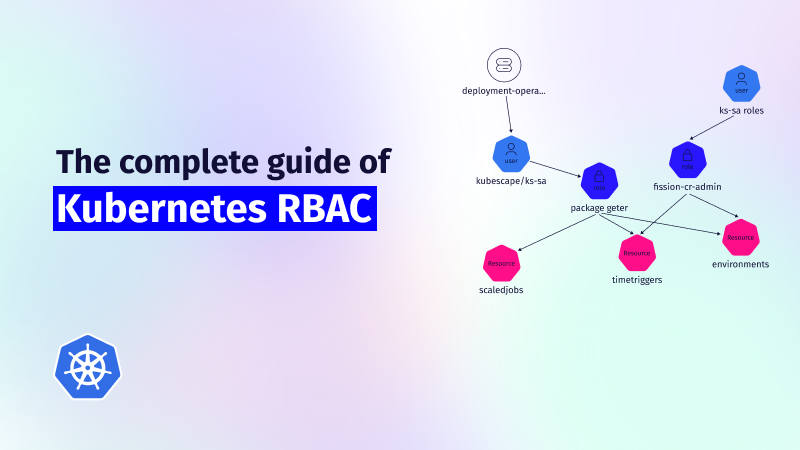
Kubernetes RBAC: Deep Dive into Security and Best Practices
This guide explores the challenges of RBAC implementation, best practices for managing RBAC in Kubernetes,...

Jul 12, 2022
Kubernetes leverages various deployment objects to simplify the provisioning of resources and configuration of workloads running in containers. These objects include ReplicaSets, lSets, Sets, and Deployments. A pod is the smallest deployment unit in Kubernetes that usually represents one instance of the containerized application.
Considered the fundamental building block of a Kubernetes ecosystem, a pod’s template is used by almost all Kubernetes deployment objects to define configuration specs for the workloads they manage.
In this article, we learn how pods enable resource sharing and the different approaches to deploying a pod.
A pod is the most basic execution unit you can create and manage in Kubernetes. It represents a single instance of the workload/application and encapsulates one or more containers. A pod packages containers along with container resources, such as networking (each pod has a unique IP), storage, and container execution information. For multi-container pods, all containers are managed as a single logical entity with shared resources.
Being the smallest deployment unit of a Kubernetes cluster, a pod can be used as a template when configuring other deployment objects such as ReplicaSets, Deployments, and StatefulSets.
Pods are created in two ways:
When creating pods manually, cluster administrators specify the configuration in a YAML/JSON manifest file. The file is divided into four main sections, namely:
Specifications within a manifest are included in a .yaml/.json file and used to manage various stages of a pod lifecycle, including deployment, configuration, and termination.
Once a pod is deployed, it requests compute resources (CPU and memory) to guide the Kubernetes controller in determining the node for deployment. A request typically represents the minimum number of resources for scheduling a node to host the pod. Cluster administrators can set CPU and memory requests for both the pod and the containers it runs. When a container request is set, the pod request is assumed to be the sum total of individual container requests.
Container requests can be specified in the manifest as follows:
spec.containers[].resources.requests.cpu
spec.containers[].resources.requests.memory
spec.containers[].resources.requests.hugepages-<size>
A pod limit is a specification in the manifest that defines the maximum amount of memory or CPU that Kubernetes assigns to a pod. Although limits in Kubernetes ensure that a container does not consume resources above the specified value, they can also prevent workloads from causing resource contention and system instability by starving the node’s OS of resources.
In the manifest files, limits can be specified as follows:
spec.containers[].resources.limits.cpu
spec.containers[].resources.limits.memory
spec.containers[].resources.limits.hugepages-<size>
Kubernetes runs pods on the cluster’s node pool by default. As Kubernetes only schedules pods on a node that satisfies resource requests, explicitly specifying resource requests is often a preferred method of determining and assigning pods to an appropriate node. To do so, administrators can explicitly force the deployment of a pod on a specific node by setting the pod manifest’s nodeSelector spec.
The sample snippet below outlines the specification for pods to be deployed on nodes with SSD disks only:
spec:
  containers:
  - name: darwin
    image: darwin
  nodeSelector:
    disktype: ssd
A more expressive and verbose form of constraining pods to specific nodes is using inter-pod affinity and anti-affinity rules. Node affinity types in Kubernetes include:
As pods are ephemeral, when they terminate, the data they process and store is also lost. Kubernetes allows various volume abstractions through PersistentVolume, PersistentVolumeClaim, and StorageClass to persist data for workloads in pods.
Once the PV and PVC are configured, you can call the PVC within the pod as shown:
spec:
  volumes:
    - name: darwin-storage
      persistentVolumeClaim:
        claimName: darwin-claim
Since a pod is a unified logical host, containers running within the same pod are allowed to share network resources and can communicate with each other via localhost or other interprocess communication systems. Kubernetes uses various services to enable networking functions for pods. The service object abstracts a logical set of pods and gives pods their own IP addresses, allowing for service discovery and load balancing.
Services in Kubernetes can be primarily categorized as:
In this section, we go through the steps to create and manage a pod in an existing Kubernetes cluster. While this demo uses a Minikube cluster, the steps are essentially the same for any production-grade Kubernetes cluster configured to use the kubectl CLI tool.
Kubernetes allows starting containers using the CLI and custom arguments. The syntax format for running a pod is similar to:
$ kubectl run pod-name --image=image-name
In our case, to deploy a pod named darwin running an nginx image:
$ kubectl run darwin –image=nginxOn successful execution of the command above, the following response is returned:
pod/darwin createdNow, verify the creation using the kubectl get command:
$ kubectl get pods
This returns the details of the various pods that are already provisioned within the cluster:
NAME     READY   STATUS    RESTARTS   AGE
darwin   1/1     Running   0          3m41s
Apart from using the CLI tool, you can also use a configuration manifest for deploying a pod in a working cluster. This is one of the most preferred ways of managing an entire lifecycle of a pod, including deployment, configuration/updation, and termination.
Start with creating a directory to store the pod manifest file:
$ mkdir pod-exampleTo create the file, type the following specification text into the text editor and name it darwin.yaml:
apiVersion: v1
kind: Pod
metadata:
  name: darwin
spec:
  containers:
  - name: nginx
    image: nginx:1.21.4
    ports:
    - containerPort: 80
Once the specification file is saved, run the following command to deploy the pod:
$ kubectl apply -f darwin.yaml
This returns a response of the form:
pod/darwin created
To verify pod creation, run the kubectl get command, as shown:
$ kubectl get pods -w
The above command watches for pods and returns the following list of pods deployed:
NAME     READY   STATUS    RESTARTS   AGE
darwin   1/1     Running   0          24s
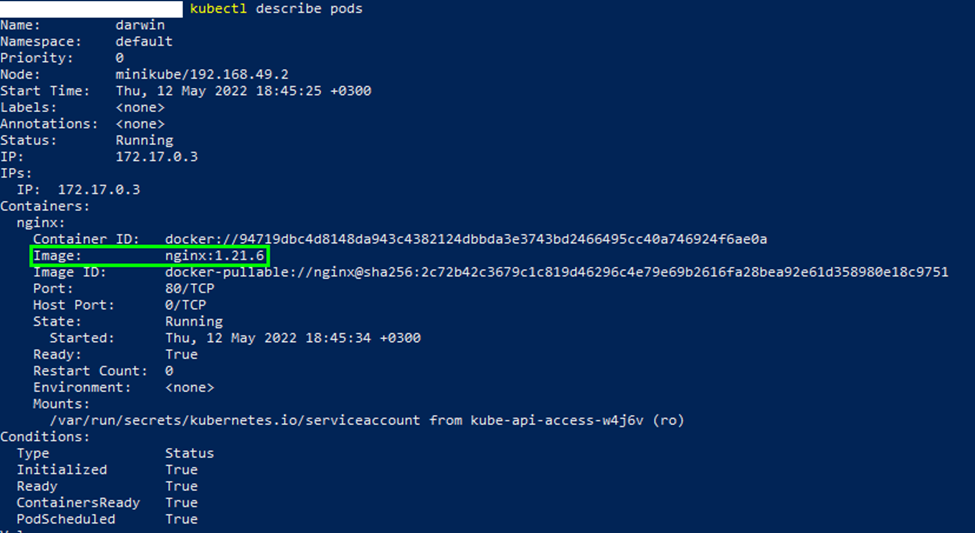
You can also verify that the pod is running the specified image by using the command:
$ kubectl describe pods
This provides details of the pod specification, including the image name as shown in the output image below:
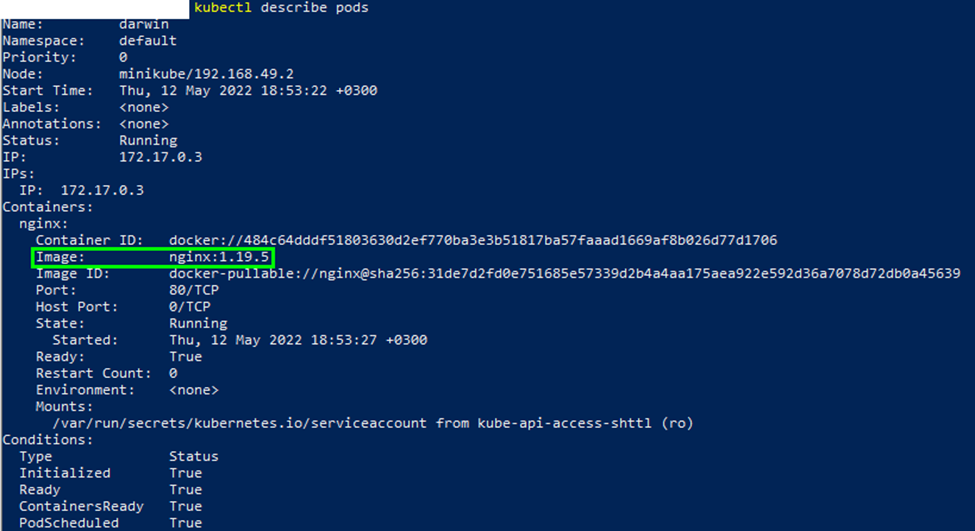
Once a pod is deployed, it’s possible to use the config file to update and make changes to its specification. For instance, to change the Nginx image version to 1.19.5, you can edit the spec section of the manifest file
spec:
  containers:
  - name: nginx
    image: nginx:1.19.5
    ports:
    - containerPort: 80
To apply these changes:
$ kubectl apply -f darwin.yaml
This returns the prompt:
pod/darwin configured
Verify the changes using the describe command, and check for the image version:
$ kubectl describe pods
The above returns the details of the pod specification, as shown in the output below:
As an optional step, to clean up the cluster, you can terminate the pod using the kubectl delete command:
$ kubectl delete pod darwin
You should then see the response:
pod "darwin" deleted
Instead of running containers directly, Kubernetes allows for the encapsulation of containers within pods to enable efficient, intelligent resource sharing. You can also use pods to connect workloads with required environmental dependencies in order to run containers in the pod.
Even though most deployments use controllers for automated deployment, it is important to understand how pods work since they form the basis for all other deployment objects of a Kubernetes cluster.
This guide explores the challenges of RBAC implementation, best practices for managing RBAC in Kubernetes,...
Role-Based Access Control (RBAC) is important for managing permissions in Kubernetes environments, ensuring that users...

In the dynamic world of Kubernetes, container orchestration is just the tip of the iceberg....
